Here is a step-by-step tutorial to implement Dropzonejs for file upload in ASP.Net Core Razor Pages, covering the most basic functionalities like drag-drop upload, list server contents, delete files, client side image resize and localization.
In this tutorial I will use Dropzone for drag-drop file upload.
Install Dropzone :
Right click on projects wwwroot folder then navigate to Add and then click New Client Side Library
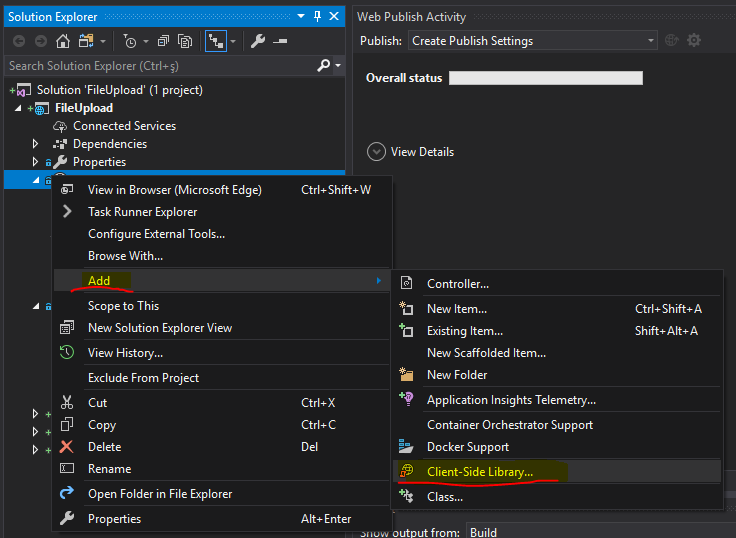
In the opened dialog type dropzone, select the latet version (v5.5.1 used in this tutorial) and click Install:

Adding js libraries to upload page :
- Add style section inside head tags of _Layout.cshtml file so we can add css files in place:
@RenderSection("Styles", required: false)
- Add styles to the upload page, in this sample the upload page name is "Index.cshtml" and is palced under "Pages" folder in the project root directory.
@section Styles{
    <link rel="stylesheet" href="~/dropzone/min/basic.min.css" />
    <link rel="stylesheet" href="~/dropzone/min/dropzone.min.css" />
}
- Add js libraries to the upload page :
@section Scripts{
    <script src="~/dropzone/min/dropzone.min.js"></script>
}
- Create upload form :
<form method="post" class="dropzone" id="dropzoneForm" asp-action="./Index" enctype="multipart/form-data">
    <div class="fallback">
        <input type="file" name="files" multiple />
        <input type="submit" value="Upload" />
    </div>
</form>
- Add dropzone options into scripts section :
@section Scripts{
    <script src="~/dropzone/min/dropzone.min.js"></script>

    <script>
        Dropzone.options.dropzoneForm = {
            addRemoveLinks: true,
            paramName: "files" //default param name is "file", make it "files" so it matches our parameter name in the method
        };
    </script>
}
When uploading files we need to extract the file name from the uploaded file, or we use a temporary file name as suggested in Microsoft docs. So, we will use a helper method to create temporary file name.
Under project root create a new folder named "Utilities" and inside it create a new class named "IFileNameExtension.cs" :
public static class IFileNameExtension
{
    public static string TempFileName(this IFormFile file, bool randomName = true)
    {
        var ext = file.FileName.Substring(file.FileName.LastIndexOf('.'));

        var fileName = randomName ? Path.GetTempFileName() : file.FileName;

        var start = fileName.LastIndexOf('\\');
        var end = fileName.LastIndexOf('.');

        return fileName.Substring(start, end - start) + ext;
    }
}
We created an extension method to IFormFile that can create a temporary file name or return the uploaded file name.
Create file upload handler :
Back to the file upload page, here is no "OnPostAsync" method just create one and modify it to accept "List" to handle multiple file uploads :
public async Task OnPostAsync(List<IFormFile> files)
{
    foreach (var file in files)
    {
        //get uploaded file name
        var fileName = file.TempFileName();

        if (file.Length > 0)
        {
            using (var stream = new FileStream($"wwwroot\\upload\\{fileName}", FileMode.Create))
            {
                await file.CopyToAsync(stream);
            }
        }
    }
}
Not: Under wwwroot folder create a new folder and name it "upload", this will be the folder to save uploaded files.
The project is ready, now we have implemented drag-drop file upload. NExt we will add more functionalities to complete the project.
Get files from the server :
Basically, dropzone requires three parameters for the uploaded file to be displayed in the dropzone area; name, size and path. So, under "Utilities" folder we create a new class named "FileItem.cs" that includes the three parameters as below :
public class FileItem
{
    public string Name { get; set; }
    public string FilePath { get; set; }
    public double FileSize { get; set; }
}
Add method to return list of files from the server as json :
public JsonResult OnGetListFolderContents()
{
    var folderPath = $"wwwroot\\upload";

    if (!Directory.Exists(folderPath))
        return new JsonResult("Folder not exists!") { StatusCode = (int)HttpStatusCode.NotFound };

    var folderItems = Directory.GetFiles(folderPath);

    if (folderItems.Length == 0)
        return new JsonResult("Folder is empty!") { StatusCode = (int)HttpStatusCode.NoContent };

    var galleryItems = new List<FileItem>();

    foreach (var file in folderItems)
    {
        var fileInfo = new FileInfo(file);
        galleryItems.Add(new FileItem
        {
            Name = fileInfo.Name,
            FilePath = $"https://localhost:44326/upload/{fileInfo.Name}",
            FileSize = fileInfo.Length
        });
    }

    return new JsonResult(galleryItems) { StatusCode = 200 };
}
Add upload settings to Dropzone init, so the dropzone script will be :
<script>
        Dropzone.options.dropzoneForm = {
            addRemoveLinks: true,
            paramName: "files", //default param name is "file", make it "files" so it matches parameter name in the method

            init: function () {
                var myDropzone = this;
                $.getJSON('./?handler=ListFolderContents').done(function (data) {
                    //Call the action method to load the images from the server

                    if (data!== null && data.length > 0) {

                        $.each(data, function (index, item) {
                            //// Create the mock file:
                            var mockFile = {
                                name: item.name,
                                size: item.fileSize,
                                filePath: item.filePath
                            };

                            // Call the default addedfile event handler
                            myDropzone.emit("addedfile", mockFile);

                            // And optionally show the thumbnail of the file:
                            myDropzone.emit("thumbnail", mockFile, item.filePath);

                            // Make sure there is no progress bar ober tha image
                            myDropzone.emit("complete", mockFile);

                            // subtract loaded files from max files count to keep upload limit
                            //myDropzone.options.maxFiles -= 1;
                        });
                    }
                });
            }
        };
    </script>
Delete files :
As you noticed, there is already a "remove file" link in the drop onze area, but it needs implementation to delete files. First we create the delete method :
public JsonResult OnGetDeleteFile(string file)
{
    var filePath = Path.Combine($"wwwroot\\upload\\{file}");

    try
    {
        System.IO.File.Delete(filePath);
    }
    catch
    {
        return new JsonResult(false) { StatusCode = (int)HttpStatusCode.InternalServerError };
    }

    return new JsonResult(true) { StatusCode = (int)HttpStatusCode.OK };
}
Then we add delete implementation to drozone script :
dictRemoveFileConfirmation: "File will be deleted, click OK to continue?",

removedfile: function removedfile(file) {
    $.getJSON("./?handler=DeleteFile&file=" + file.name).done(function (result) {
        console.log("delete: " + result);
        if (result === true) {
            if (file.previewElement != null && file.previewElement.parentNode != null) {
                file.previewElement.parentNode.removeChild(file.previewElement);
            }
        }
    });
},
When you click "Remove File" a confirmation message will appear before deleting the file.
Client side image resize :
Dropzone comes with a great functionality to resize uploaded images on the client side, so we can save bandwidth and workload on the server side. Just add the below settings to dropzone script area :
resizeWidth: 800,
resizeHeight: 600,
resizeMethod: 'contain',
resizeQuality: 1,
If you need to add server side image resize and add text / image watermarks to the uploaded images see this article Image Resize for Asp.Net Core.
Add modal download :
Add modal download, so we can download uploaded images from the server.
Create modal html :
<div class="modal fade" id="downloadModal" tabindex="-1" role="dialog" aria-labelledby="downloadModalLabel" aria-hidden="true">
<div class="modal-dialog" role="document">
<div class="modal-content">
<div class="modal-header bg-light">
<h6 class="modal-title" id="downloadModalLabel">
<i class='fas fa-download'></i> Download (<span id="modalFileSize"></span>)
</h6>
<button type="button" class="close" data-dismiss="modal" aria-label="Close">
<span aria-hidden="true">×</span>
</button>
</div>
<div class="modal-body form-group">
<label class="form-control-plaintext" id="modalFileName"></label>
<input type="text" id="modalUrl" class="form-control myUrl" value="" readonly />
</div>
<div class="modal-footer">
<a href="" class="btn btn-success" id="modalDownload" target="_blank">
<i class='fas fa-download'></i>
Download
</a>
<button type="button" class="btn btn-secondary" data-dismiss="modal">Cancel</button>
</div>
</div>
</div>
</div>
add modal scripts:
<script>
    $('#downloadModal').on('show.bs.modal', function (e) {
        //get data-id attribute of the clicked element
        var fileUrl = $(e.relatedTarget).data('img-url');
        var fileSize = $(e.relatedTarget).data('file-size');
        var fileName = $(e.relatedTarget).data('file-name');

        var fs = fileSize / (1024 * 1024);

        //populate the textbox
        $("#modalUrl").attr("value", fileUrl);
        $("#modalDownload").attr("href", fileUrl);
        $("#modalFileSize").html(fs.toFixed(2) + " MB");
        $("#modalFileName").html(fileName);
    });
</script>
To add modal to every file in dropzone area, add the below code to init section in dropzone scrip section :
myDropzone.on("addedfile", function (file) {
    var downloadBtn = Dropzone.createElement("<a class='dz-download' style='visibility:hidden' href='#downloadModal' data-file-name='" + file.name + "' data-toggle='modal' data-file-size='" + file.size + "' data-img-url='" + file.filePath + "'><i class='fas fa-download text-success'></i></a>");

    file.previewElement.appendChild(downloadBtn);

    file.previewElement.addEventListener("click", function () {
        downloadBtn.click();
    });
});
Now everything is done, we have created a drag-drop file upload with ability to list server files, delete files, resize images and added modal for downloading file.
Github repository: https://github.com/LazZiya/FileUpload